A program may store persistent data in on-chip flash and in a previous blog I showed you how to initialized the simulating on-chip flash from Javascript.
Programs that also or instead store data in SPI memory may want to simulate this off-chip memory too. So in the next few blogs I will show you how to simulate SPI memory with Javascript.
My example program is using bit-bashing to control the SPI memory and it is writing the BSRR register of port B to do this (STM32Fxxx chip). So my first step it to create an event handler which will be called whenever my simulating program writes to g_pGPIOB->BSRR. I can get the Embedded Development Studio to create the appropriate Javascript code for me. To do this, I right mouse click on my Javascript source file and from the context menu that opens select jState Code Creation Wizards->GPIOB.

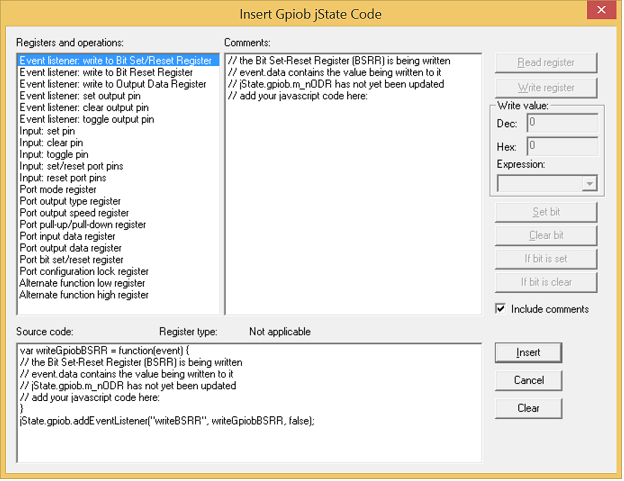
When I click on GPIOB, the code creation wizards opens:

This allows me to see all of the events and properties available for jState.gpiob.
I am interested in the first item and when I select it I see the source code (with comments) that the wizard will generate for me. I click on Insert and this Javascript code it is placed into my Javascript file.
var writeGpiobBSRR = function(event) {
    // the Bit Set-Reset Register (BSRR) is being written
    // event.data contains the value being written to it
    // jState.gpiob.m_nODR has not yet been updated
    // add your javascript code here:
}
jState.gpiob.addEventListener("writeBSRR", writeGpiobBSRR, false);
This gives me both an event handler and the code that will register that event handler.
Now, whenever my simulating program writes to the BSRR register of port B, my event handler will be called.
You might want to put something like console.log("Event handler called\n") into this event handler for test purposes.
I am going to create a Javascript Object to encapsulate my SPI Memory simulation code:
var SPIMemory = function() {
}

var spiMemory = new SPIMemory();
and into this object I can put a suitable function such as handlePortPin that I can call from the event handler:
var SPIMemory = function() {
    this.handlePortPin = function(portb, bsrr) {
    }
};
This function has two parameters. portb will contain the value of ODR (output data register) and the other is the value being written to BSRR.
Here is the modified event hander containing a call to this function:
var writeGpiobBSRR = function(event) {
    // the Bit Set-Reset Register (BSRR) is being written
    // event.data contains the value being written to it
    // jState.gpiob.m_nODR has not yet been updated
    // add your javascript code here:
    var nODR = jState.gpiob.ODR;
    spiMemory.handlePortPin(nODR, event.data);
}
With these two arguments I can determine the value of the output data register both before and after the write to BSRR. I do this in function updatePort below. Then I will know the levels of each port B pin and whether or not they are rising or falling.
var SPIMemory = function() {
    this.updatePort = function(port, bsrr) {
        // portb has not yet been updated by the BSRR value
        // return the value that portb will become
        var newport = port;
        newport |= bsrr & 0XFFFF;
        newport &= ~(bsrr >> 16) & 0XFFFF;
        return newport;
    }
    this.handlePortPin = function(portb, bsrr) {
    }
};
In the next post I will add some code to send the chip Id to the simulating program in response to the 0X9F (ReadId) command.